Beyond Likes. Into Sales.
How to Set Up Winfluencer
Get your influencer attribution up and running in 30 minutes

Got stuck? Book a free setup call
Before You Start
This guide assumes you've already:
- Registered for Winfluencer
- Logged into your account
- Have access to your Google Tag Manager account
- Can modify your DNS records (or know someone who can)
Let's get you tracking real influencer ROI.
Part 1: Download GTM Template
Step 1: Download the Winfluencer GTM Template
Navigate to the Domain Management section in your Winfluencer dashboard.
Click Download GTM Template.
Save the .tpl file to your computer.
Good News: We've submitted this template to the official Google Tag Manager Gallery. Once approved, you'll be able to install it directly from GTM!
Part 2: Configure Your Domain
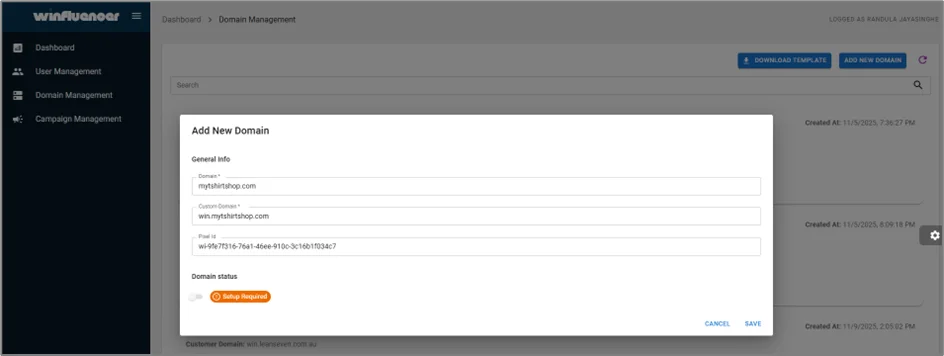
Step 2: Add Your Domain
Under the Domain Management section in Winfluencer.
Click Add New Domain.
Enter your domain without https://.
Example:
❌ Wrong: https://mytshirtshop.com
✅ Correct: mytshirtshop.com
Your Custom Domain will automatically appear.
Click Save.
Step 3: Set Up DNS Records
Now we need to verify you own this domain.
Go to your DNS provider (GoDaddy, Cloudflare, Namecheap, etc.).
Navigate to DNS Records or DNS Management.
Add a new CNAME record with these details:
Name: win
Target: api.winflncr.com
TTL: Auto (or 3600)
Save the DNS record.
Return to Winfluencer and click Verify Domain.
DNS changes can take 5-30 minutes to propagate. If verification fails, wait 10 minutes and try again.
Part 3: Set Up Google Tag Manager
Step 4: Add Winfluencer Template from GTM Gallery
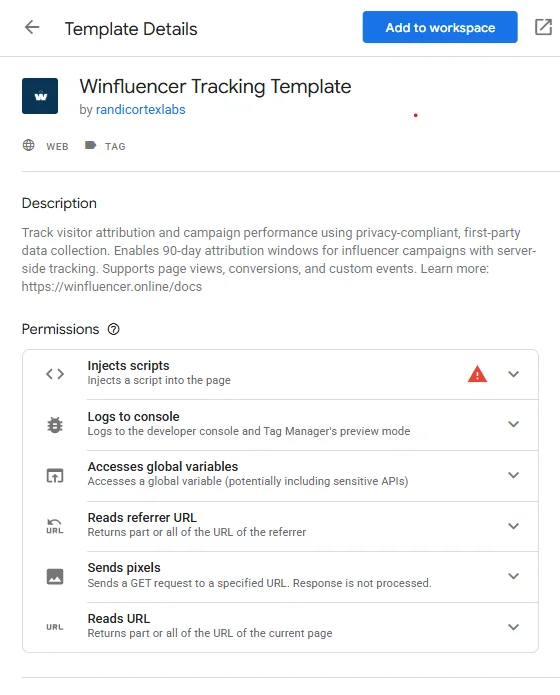
Great news! The Winfluencer Tracking Template is now available in the official Google Tag Manager Community Template Gallery. This makes installation faster and easier.
- Open Google Tag Manager.
- Go to Templates in the left sidebar.
- In the Tag Templates section, click Search Gallery.
- Search for "Winfluencer".
- Select the Winfluencer Tracking Template by randicortexlabs.
- Click Add to workspace.
- Confirm the permissions by clicking Add.
The template is now available in your GTM workspace! You can use it to create new tags.
Step 5: Create Your Pageview Tag
This tag tracks every visitor to your website.
Navigate to Tags and click New.
Click on Tag Configuration and select Winfluencer from your templates.
Configure the tag:
Pixel ID: Copy your Pixel ID from Winfluencer → Domains and paste it here.
CNAME Endpoint: Copy the Custom Domain value from Winfluencer and paste it here.
Event Type: Select Pageview.
Under Triggering, choose All Pages.
Name your tag: "Winfluencer - Pageview" and click Save.
What this does: Sets a first-party cookie on every page visit, allowing us to track the complete customer journey.
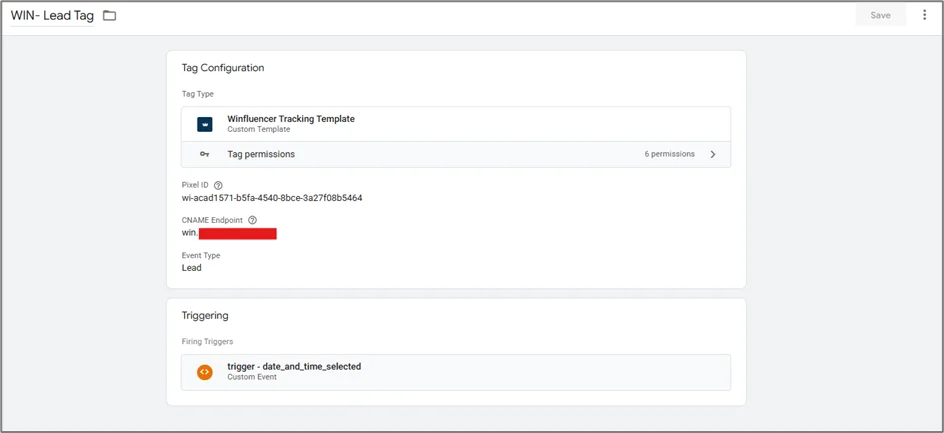
Step 6: Create Conversion Event Tags (Optional but Recommended)
Track specific actions like purchases, leads, or add-to-carts. For each conversion event:
Create a New Tag and select the Winfluencer template.
Enter the same Pixel ID and Custom Domain.
Select the appropriate Event Type (e.g., Purchase, Lead).
Set up the trigger for when this event fires (e.g., on a purchase confirmation page).
Click Save.
Step 7: Publish Your GTM Container
Click Submit in the top right.
Add a version name (e.g., "Winfluencer Setup").
Click Publish.
First-party cookies are now tracking! You're ready to create campaigns.
Part 4: Create Your First Campaign
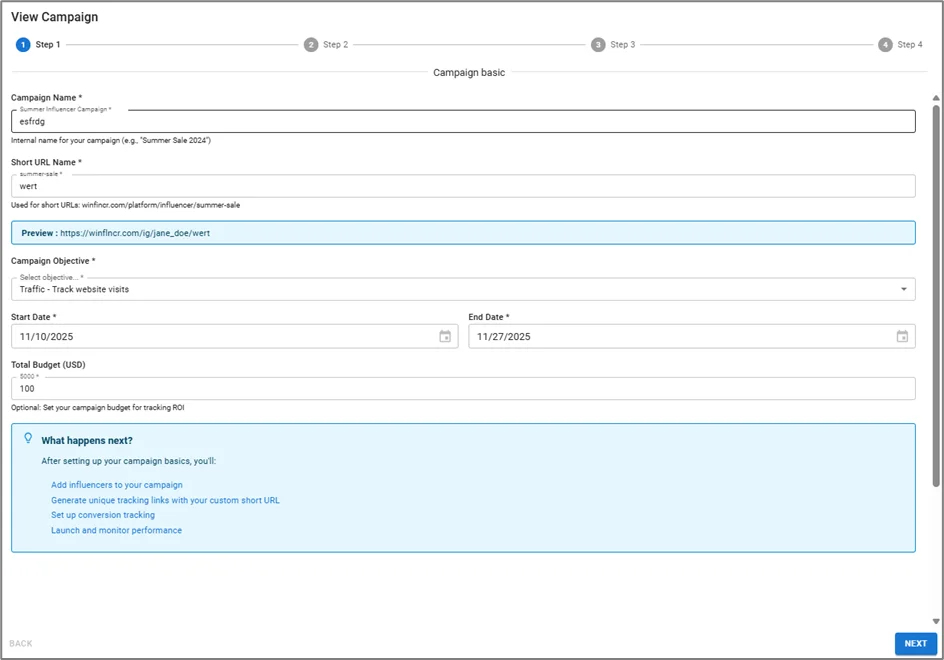
Step 8: Set Up Campaign Details
Go to Campaign Management in Winfluencer and click Create New Campaign.
Fill in the details:
Campaign Name: e.g., "Summer Collection Launch"
Short Name: e.g., "summer24" (Keep it short and memorable!)
Campaign Objective: Choose what you want to track (Traffic, Leads, Sales, etc.).
Budget & Time Frame: Set your budget and dates.
Click Next.
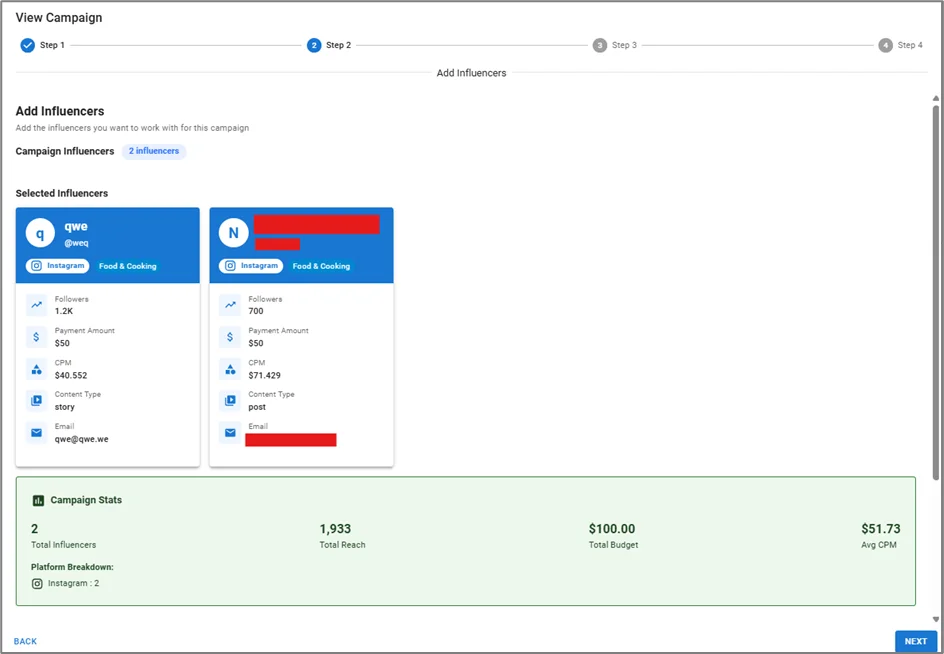
Step 9: Add Influencers to Your Campaign
Choose from the Winfluencer Network or add your own custom influencers. For each influencer, add their payment amount, content type, and deliverables.
Make sure you have a signed agreement with any custom influencers before adding them.
Step 10: Generate Tracking Links
Select the Landing Page for your campaign (e.g., /products/summer-dress).
Click Generate All Links.
Each influencer now has their own unique tracking link and a clean, shareable short URL!
Step 11: Pre-Launch Validation
Before launching, Winfluencer validates that everything is set up correctly. Look for 5 green checkmarks. If you see a red ❌, click on it for troubleshooting steps. Once all are green, click Launch Campaign.
Share Links & Track Results
Step 12: Send Links to Influencers
Copy each influencer's Short URL and send it to them. They can add it to their bio, stories, and posts.
Pro Tip: The short URLs look clean and professional—no messy UTM parameters to confuse influencers!
Step 13: Monitor Performance
Go to your Dashboard to see real-time data on clicks, conversions, revenue, and ROI for both the overall campaign and individual influencers.
You're All Set! 🎉
You can now track which influencers actually drive sales, see real revenue numbers, and prove your ROI with hard data.